Showing posts with label Baking. Show all posts

Saturday, 15 April 2017

The Batbattenburg: My Take on the Classic Cake

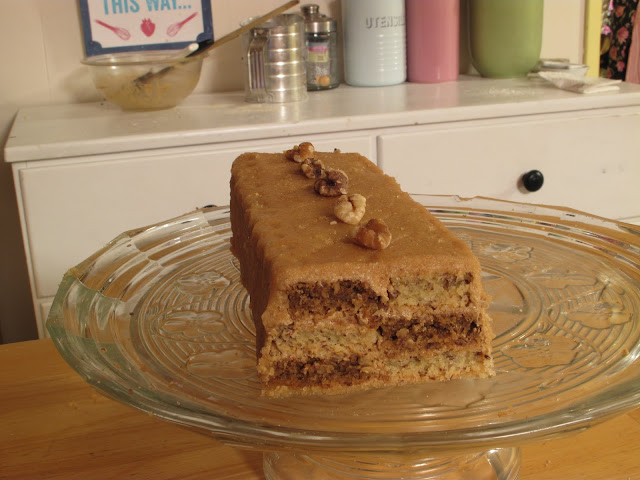
Sugar-free, gluten-free Coffee Walnut Battenburg Cake with xylitol and cassava flour

     I've been experimenting with xylitol and cassava flour to make our desserts sugar-free and gluten-free, and I'm happy to report that, for the most part, they've succeeded!

     My mom discovered cassava flour, and I decided to experiment with it because it's a light, refined texture and is supposed to work as an almost one-for-one substitute for all-purpose white flour. It has also been reported to absorb more moisture than all-purpose flour, so some sources recommend reducing the amount slightly (my guess for the reason that it absorbs more liquid is because it is even finer than regular flour).

Morning Pep xylitol and Anthony's Premium Cassava Flour
The two ingredients that have made healthy desserts possible!
Both available from Amazon.com
     My latest experiment with these two ingredients is Mary Berry's Coffee and Walnut Battenburg Cake, and the verdict from the family is favorable so far! Which means that we have another sugar- and wheat-free dessert that everyone likes! A total win in my book.

     I based my cake on the recipe from the Great British Bake Off How to Bake cookbook, and I referenced a marzipan recipe online (because, as usual, the recipe for the cake expects you to be able to find marzipan pre-made in the store – unfortunately, I live in the U.S.).

I didn't have to change much in either recipe. But be sure to read the rest of the post to see what I did change, so you can avoid my mistakes...
  1.  Cream together using a wooden spoon:
    • 100g unsalted butter
    • 90g xylitol
    • 2 large eggs at room temperature
    • 90g cassava flour
    • 1 1/3 teaspoon baking powder
    • 50g almond flour
  2. Divide the batter in half. To one half add:
    • few drops of vanilla extract
    • 1 1/2 teaspoons milk
  3. To the other half add:
    • 1 1/2 teaspoons coffee granules (I used instant coffee) mixed with 1 1/2 teaspoons milk
    • 25g chopped walnuts
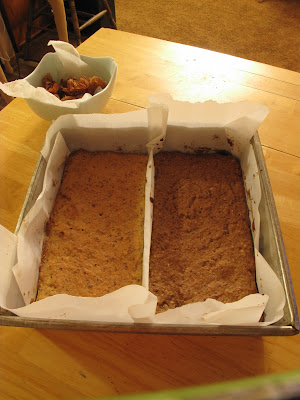
  4. Make a fold in the center of a piece of parchment paper, put it in an 8-inch square cake pan, then add the vanilla-flavored batter to one half and the coffee/walnut flavored batter to the other. 
  5. Spread with a knife, then bake for about 35 minutes (cover lightly with foil if the cakes begin to brown). Remove both cakes from the pan after a few minutes of letting them cool.
  6. For icing, mix together:
    • 100g powdered xylitol, sifted
    • 40g softened butter
    • 1/2 teaspoon coffee granules in 1 1/2 teaspoons milk

The two different batters divided by the parchment paper.
Flavoring for the vanilla batter.

Flavoring for coffee walnut batter.
My rather flat cakes
My rather flat cakes...
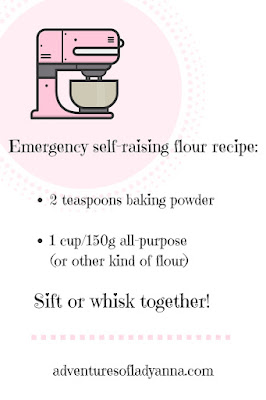
      I had to increase the baking powder from 1/2 teaspoon to 1 1/3 teaspoon. (I know there is no such thing as 1/3 teaspoon, so I'd just do a heaping 1/4 teaspoon.) ;) The recipe calls for self-raising flour and baking powder, but I was naïve and just followed the recipe without considering the implications. My cake didn't rise at all, and I am pretty sure a lack of baking powder is the reason why.

So I made a little graphic for future recipes that call for self-raising (also called self-rising) flour:

Emergency self-raising flour recipe for substitue flours.

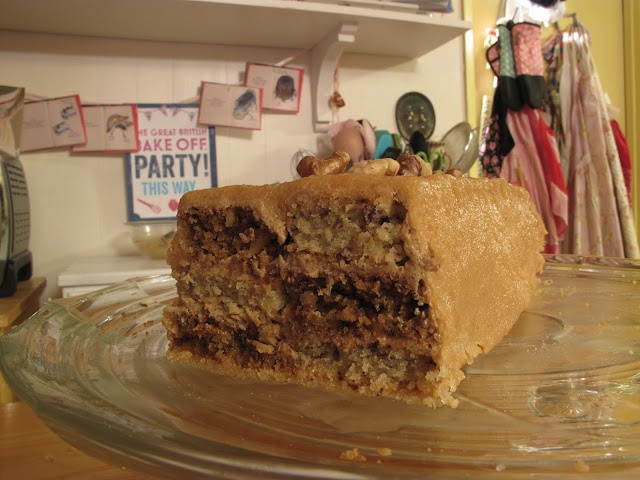
     Even with the non-rising disaster, it still tasted good! And I was able to construct it so that it didn't look as if it had been sat on. The instructions have you cut each flavor in half, then stack them to look like a chessboard. So to compensate for the lack of height, I cut mine into thirds! It was still on the small side, but it at least resembled the traditional square shape.

The marzipan recipe I used is:
  • 2 1/2 oz./5 tablespoons blanched and ground almonds (almond flour would work, too, it just wouldn't look as smooth)
  • 3 1/2 oz./7 tablespoons powdered xylitol (to get it to the fine consistency just pop it in a Ninja blender or food processor and pulse it a few times in 5 second bursts)
  • 2 teaspoons water
  • 1/4 teaspoon almond extract
  1. Sift the almonds and xylitol together.
  2. Add the water and extract, mix with your hands until it comes together. (You may need to add a little water.)
  3. Roll it into a log shape, wrap in plastic wrap, then refrigerate for about 1 hour.
  4. Roll out the marzipan between two sheets of parchment paper.
  5. To wrap around the cake, remove one piece of the parchment paper from the rolled out marzipan, then take the other and roll up the cake (making sure to press the marzipan well onto the cake before carefully removing the parchment paper).
     Ét vóila! You can now enjoy a delicious and practically-good-for-you dessert! It's perfect with tea or coffee, for birthdays and holidays, or just whenever you'd like!

Sugar-free, gluten-free Coffee Walnut Battenburg Cake with xylitol and cassava flour

Sugar-free, gluten-free Coffee Walnut Battenburg Cake with xylitol and cassava flour


Sugar-free, gluten-free Coffee Walnut Battenburg Cake with xylitol and cassava flour


© Anna Morton 2017

Saturday, 11 February 2017

Baking with The Great British Bake Off Season 7!

Raspberry and Rhubarb Drizzle Cake
     I have been obsessed with trying recipes from The Great British Bake Off after we saw all of the delicious drama unfold on the BBC during our last trip to England in September. As usual, watching every episode made me wish very much for some dessert, but unfortunately on our trip we had no kitchen, so the only thing to do was to wait until we got home to try my favorites! There were many techniques, flavors and pastries that I had never tried before, so there were many adventures to be had.

     One recipe that caught my eye was the Raspberry and Rhubarb Drizzle Cake with Custard, made by Candice for the drizzle cake signature challenge during cake week (week one). I mean, really, raspberry and rhubarb – with custard? How could I not try it?

You can find the recipe here.

     The outcome of my attempt was not worthy to be seen by Mary Berry and especially Paul Hollywood, but I was pleased with the taste. It is made with ground pistachios, almonds and polenta so it will be gluten free and very moist – but the batter was very moist – so moist that my cake rather fell apart during the transfer from pan to plate. I'm not sure why. I was still getting used to our new oven, so perhaps it needed to bake a little longer. The pan also might have needed a bit more greasing before I poured the batter in. I used a slightly larger bundt pan than the one Candice used on the show, so the batter only came to about 1 1/2 inches below the edge of the pan. I don't think this affected the baking (if anything, it should have made the cake bake more quickly).

     It is nearly impossible to find fresh rhubarb in the stores at any time other than spring in California. Frozen rhubarb, however, does occasionally lurk in the freezer section! Sprouts is my source for the frozen stuff. I only had about two thirds of the rhubarb I needed for the recipe, but there was still a nice rhubarb flavor coming through, so if you find yourself short of this amazing ingredient, don't panic.

     As to the custard... I don't have a fabulous track record with making custard. For one thing, I always have to stand there stirring it over low heat on the stove for two to three times as long as the recipe says is necessary for it to thicken. This attempt was no exception. I always end up turning the heat almost to medium after about ten minutes, and so far I haven't burnt or seriously curdled any custard. It wasn't quite perfectly creamy, but it still had the delicious taste that custard should. I tell you so that you will not despair in your own custard attempts.

     The result was marvelously, fabulously beyond delicious! The tartness of the rhubarb with the mild sweetness of the custard may be one of the best flavor combinations ever attempted. I also liked the slightly grainier texture that the ground nuts added to the cake, especially because the cake is so moist with all of the fruit, custard and syrup. Because it is made of nuts the cake doesn't turn to mush in your mouth.

     I certainly wouldn't mind having an excuse to make this again, perhaps when we have fresh rhubarb in season. I'm always looking for an excuse to make rhubarb desserts! (Well, any dessert, really...)


© Anna Morton 2017


Sunday, 3 July 2016

As American as Cherry Pie – or should I say British...

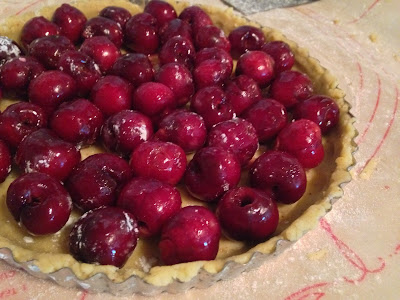
| Making my first cherry pie – a British one! |
| Making my first cherry pie – a British one! |
     One of my latest baking adventures involved embarking on the creation of a cherry pie. I've never attempted one before, so I decided to consult the experts – which in my case is The Great British Bakeoff: How to Bake cookbook! And just as a British cherry pie seems a twist on it's usual American associations, this recipe gives us something just a little different. Instead of the usual flour, fat and water that you mix together and roll out, we get to have a bit more fun by adding almonds to the dough and grating it!

     Now, if you know much about British desserts you have probably heard of the Bakewell tart, that little pastry flavored by cherry and almond, which gives this recipe even more of a British connection. Then if on top of that fact you confess that you aren't the greatest fan of too much almond flavor, allow me to reassure you that this recipe is as delicious as any cherry pie imaginable – it is fresh, simple and bursting with the flavors of juicy cherries and a sweet crunchy crust!

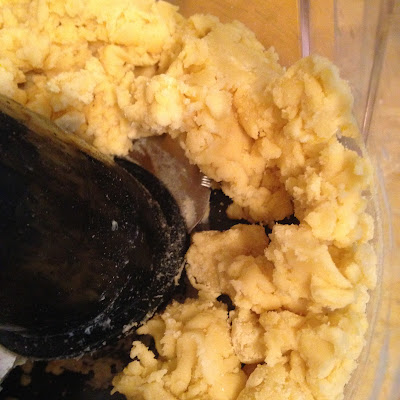
     For the crust I simply threw everything into a food processor and pulsed it a few times:
  • 250g all-purpose flour
  • 50g ground almonds (I love the almond flour from Trader Joe's!)
  • 175g unsalted butter, chilled and diced
  • 100g sugar
  • 2 large egg yolks
  • 3 tablespoons cream
  • 1 tablespoon iced water
     Then you mold it into one big lump, wrap it in plastic wrap and refrigerate it. The recipe said to refrigerate it for half an hour, but I left mine in longer while I got distracted doing other things, and it hardened into a nice solid piece, which turned out to be easier to grate than it would have been after only half an hour.

Pie crust dough mixed in a food processor

     I have to say, grating crust is not necessarily easier than rolling it out. The dough inevitably begins to soften in your hands so that by the end you're sort of squishing it through the grater. But then you don't have to deal with finding the space to roll it out, or the dough sticking to the counter top, or the dough cracking when you lay it into the pie plate (off-centered, of course...). But I'll admit that the best thing about it – let's be honest – is that it's just fun do do!

     Basically you slice the lump of dough in half, grate the first half into the pie pan and squish it down with your fingers until it's in an even layer on the bottom and up the sides...

Almond pie crust grated into the pan

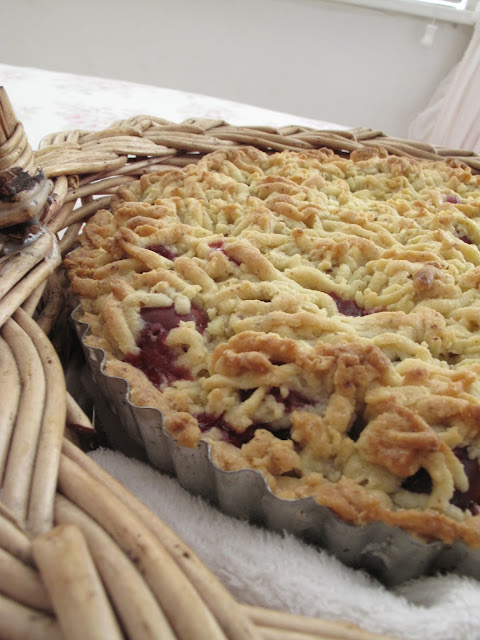
....then you put the filling in before taking the second half of the dough and grating it all over the top. Et vòila!

Almond pie crust grated onto the pie


     It seems like quite a lot, but once it's all cooked it flattens out a bit and turns into a deliciously mild, sweet, nutty, crumbly pie crust that ought to be a part of more recipes. :)

The marvelous Warm Cherry Crumble Pie!


© Anna Morton 2016


Friday, 17 June 2016

Tales of a Breadmaking Novice

     
Spelt bread from The Great British Bakeoff: How to Bake cookbook.
     I have officially made my first loaf of bread! Huzzah! This is a momentous occasion after several failed attempts at recipes containing the dreaded yeast. For years it has been my Achilles' heel, but no more!

    Last weekend I attempted the whole grain/spelt bread recipe from The Great British Bakeoff: How to Bake by Linda Collister, and it worked wonderfully! It actually looked like real bread and tasted delicious! It has a soft, slightly crumbly texture and a mild flavor, with the smallest bit of sharpness. It goes beautifully with butter, and can hold its own flavor when dipped in olive oil or soup.


     Now I shall share the secrets that led to my triumph, and hopefully they will help you to avoid the mistakes that tripped me up in the past.

#1: Find a foolproof place for rising


     I always fell at this most important hurdle. I set the bowl on the top of our refrigerator or near a sunny window or on top of the dryer, and yet I would check the progress of my dough in vain. I don't think it ever increased more than 30% – at the most – no matter how long I left it. At least three times I attempted yeast recipes with the same frustrating results... until one day I did something brilliant: I looked on Pinterest!

     Someone on that invaluable website had had a stroke of genius, and came up with a reliable way to keep your dough warm while it rises:
  1. You boil water
  2. Put the boiling water in a pan (or a cup)
  3. Put the covered dough in with the pan in the oven (or put it in the microwave with the cup)
  4. Sit back and watch your dough rise
     This method has not failed me yet! It may not be absolutely foolproof, but it's pretty close since you are placing the dough in a more controlled space than the less-than-predictable air of your kitchen.

     I'm sure many of you have heard of this technique before, but for those of us who are still searching for the key (as I was), I would heartily recommend giving this a try.

Bread dough
The dough doubled in size after sitting in the microwave! So exciting.

#2: Use enough liquid in the yeast paste


     Once I tried a recipe that had me blend the dry yeast with a bit of warm milk – sounds simple, right? Well, it is possible for me to fail even in that. I put in just enough milk to make the yeast clump together in the most unappetizing lumpy mess. I had some misgivings but I thought it would mix together with the rest of the dough and be fine. Wrong. The dough did rise (a little), but even after it was baked the mixture tasted overpoweringly of yeast – and now I know why yeast is not a popular flavor for anything.

     I hope I'm not the only person in history who has ever done that. But I also hope that this little mention of it will keep you from joining me on that list.

The dough after kneading in the salt, olive oil and last batch of flour.

#3: Follow the recipe (and read it all the way through beforehand – maybe two or three times)


     I got a little confused when I read this particular recipe because you add the flour in three batches of 250g. I got confused as to when each batch of flour was supposed to be put in, so I ended up doing things a bit out of order. (I almost ruined it by adding the last batch too soon.)

     Thankfully the recipe wasn't ruined! But I wanted to give this advice because I thought I had read the recipe thoroughly, when it turns out I really hadn't been as thorough as I'd thought.

     I suppose another aspect to this advice is that if you do misread a recipe then you don't necessarily have to panic. Just stop and look at what you're doing, what the recipe is telling you to do next, and how much the mistake will effect the outcome, then decide if it will still turn out – it may be salvageable more often than you'd think!

Spelt bread ready to go into the oven
The dough all ready to go into the oven at last!

     Thanks for reading! In my next post about baking I'll share my experience with grated almond flour pie crust and my first ever cherry pie...


© Anna Morton 2016